

How to Use an Assisted Pull-Up Machine: A Beginner's Guide

Ever stared at the assisted pull up machine at the gym and felt a mix of curiosity and confusion? You know it’s the key to building a powerful back and achieving the holy grail of bodyweight exercises-the pull-up-but the questions quickly pile up. How much weight do I use for help? Am I even doing this right? Why do my arms feel everything and my back feels nothing? It’s a common frustration that keeps many people from unlocking one of the best tools for building upper-body strength.
Consider this your official guide to turning that intimidation into confidence. We are going to demystify this powerful machine and show you exactly how to use it to your advantage. In this beginner's guide, you'll learn how to set the perfect assistance weight, master the form that targets your lats effectively, and follow a simple progression plan that will have you well on your way to conquering your first unassisted pull-up. Let's make this machine your new best friend at the gym.
What Is an Assisted Pull-Up Machine & Why Should You Use It?
The pull-up is one of the most effective upper-body exercises, but it's also one of the most challenging. This is where the assisted pull up machine comes in. Its core function is to counterbalance your body weight, making the movement achievable for all fitness levels. By selecting a specific weight on the stack, the machine provides an upward "assist," effectively reducing the amount of weight you have to lift. This turns a difficult goal into a manageable starting point.
To see how this works in practice, watch this quick demonstration:
Beyond just making the exercise easier, this machine is the ultimate tool for learning the correct pull-up movement pattern. Instead of kipping or using improper momentum, you can focus on controlled movement and proper muscle engagement. By reducing your effective body weight, assisted pull-ups allow you to build the mind-muscle connection needed to activate your lats, rhomboids, and biceps correctly. This machine also provides a clear path for progressive overload; as you get stronger, you simply reduce the assistance weight, gradually preparing your body to handle its full weight.
The Key Benefits of Assisted Pull-Ups
Integrating this machine into your routine offers several distinct advantages:
- Builds Foundational Strength: It allows you to safely strengthen your back and biceps without the risk of injury from poor form on unassisted attempts.
- Teaches Proper Form: You can master the full range of motion-from a dead hang to getting your chin over the bar-engraining good habits from day one.
- Promotes Muscle Growth: The assistance enables you to perform higher repetition sets (e.g., 8-12 reps), which is ideal for hypertrophy (muscle growth).
- Versatile Training Tool: Use it for a warm-up to activate your back muscles or as a finisher to burn out your lats at the end of a workout.
Assisted Pull-Up vs. Lat Pulldown Machine
While both machines target the lats, they are fundamentally different. The assisted pull-up machine facilitates a closed-chain exercise, where your body moves through space while your hands remain fixed. This far more accurately mimics a real pull-up and engages more stabilizing muscles. In contrast, the lat pulldown is an open-chain exercise where you remain stationary and pull a bar down. While the lat pulldown is excellent for isolating the lats, the assisted pull-up is superior for building the functional strength needed for the real thing. They are not mutually exclusive; both are valuable additions to a well-rounded back workout.
How to Use the Assisted Pull-Up Machine: A Step-by-Step Guide
The assisted pull up machine can seem complex, but it's a fantastic tool for building the foundational strength needed for unassisted pull-ups. By following a structured approach, you can ensure you're performing the exercise safely and effectively from your very first rep. Think of this process in three phases: setup, execution, and completion. For a complete overview, many find resources like the Beginner's Guide to the Assisted Pull-Up Machine from Asphalt Green incredibly helpful before their first attempt.
Step 1: Setting the Assistance Weight
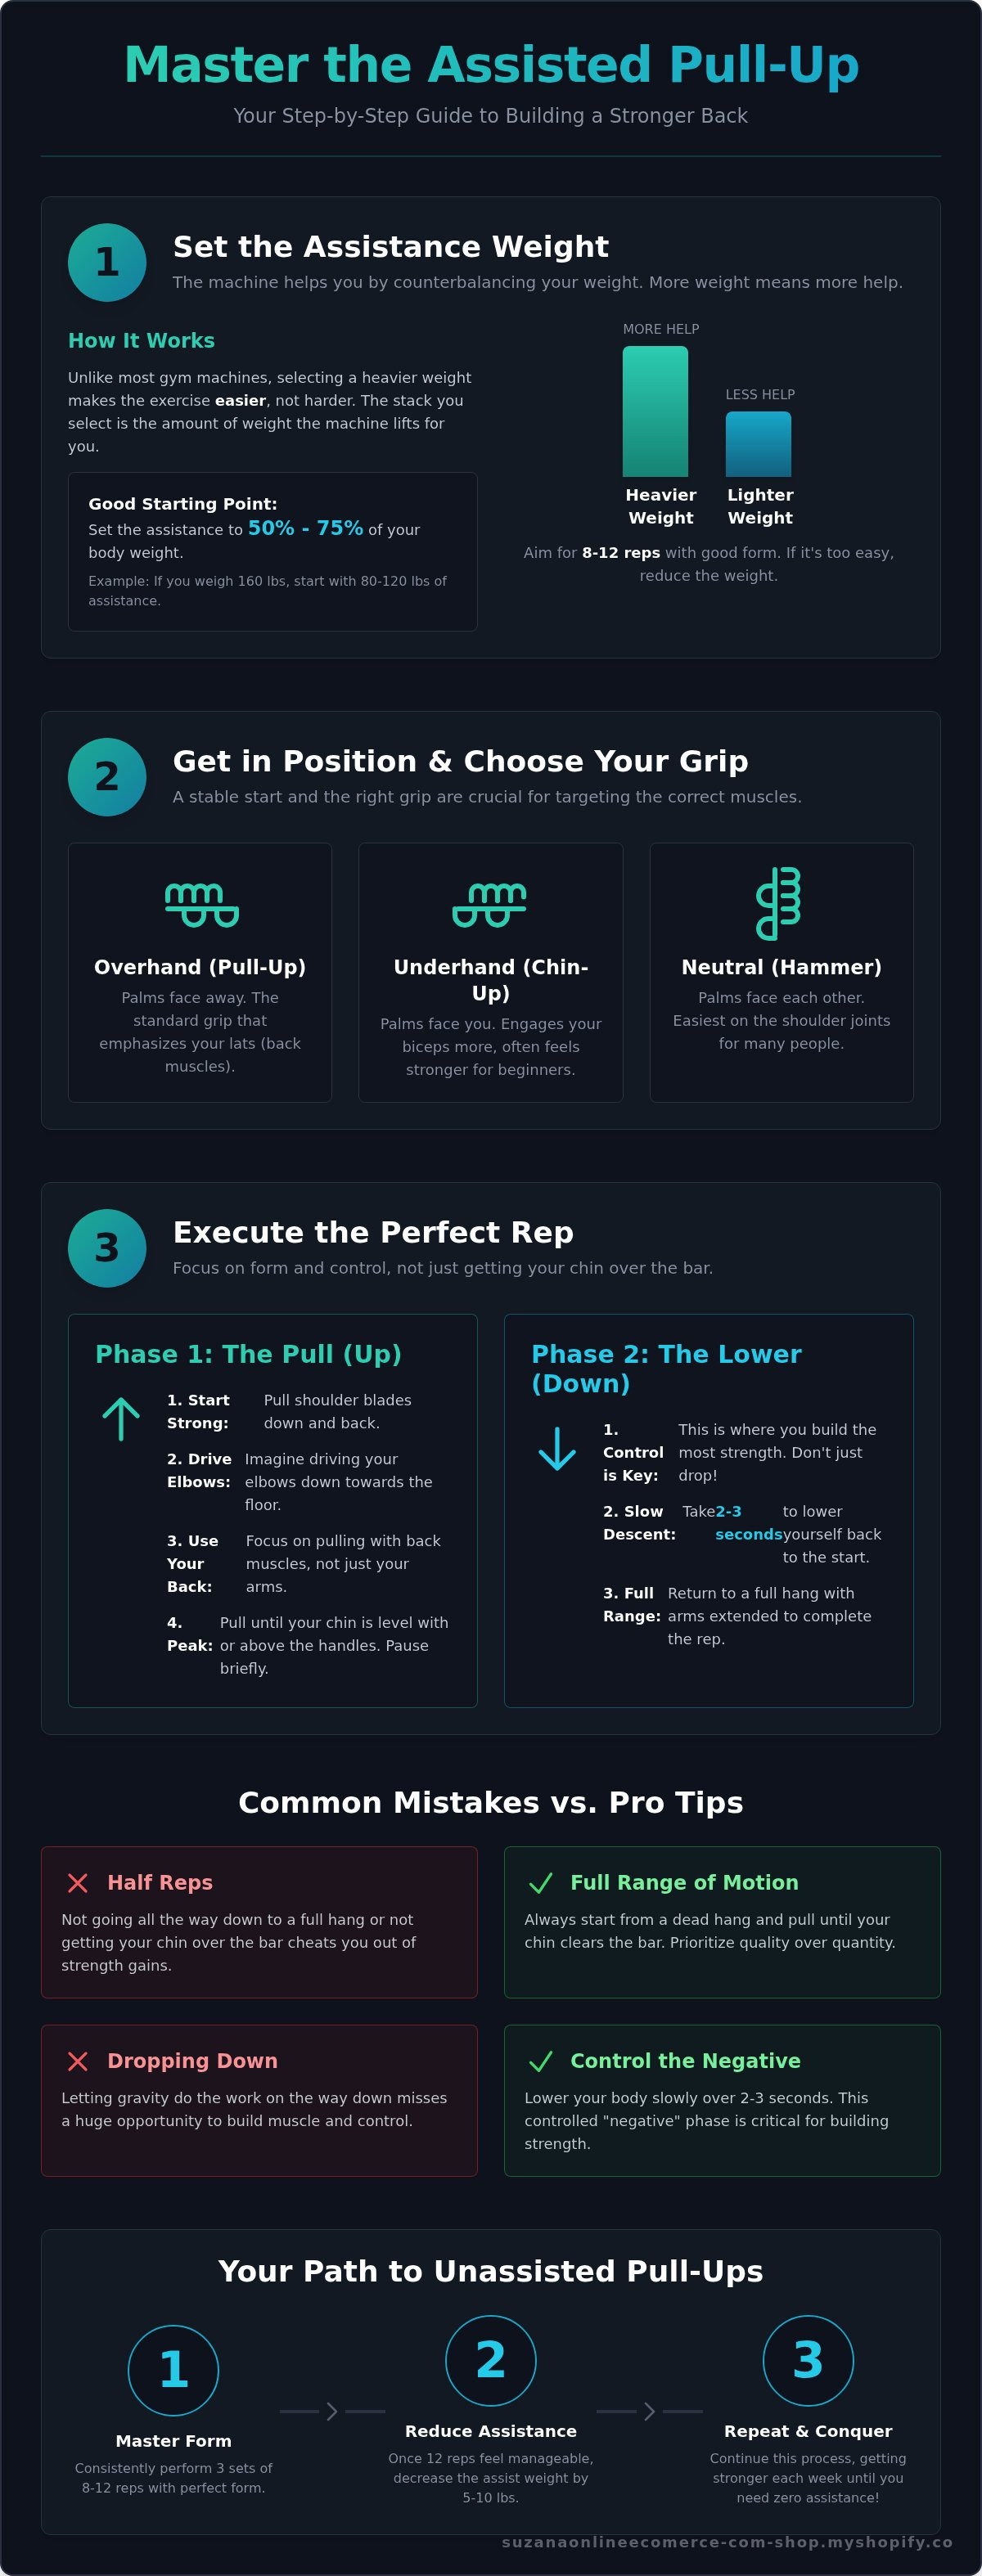
The weight stack on this machine works opposite to most others: the more weight you select, the more assistance you get, making the pull-up easier. A good starting point is to select a weight that is 50-75% of your body weight. For example, if you weigh 160 pounds, start with the pin set between 80 and 120 pounds. The goal is to find a weight that allows you to complete 8-12 repetitions with proper form. It's always better to start with too much assistance (a heavier weight) and reduce it as you get stronger.
Step 2: Getting into Position and Choosing Your Grip
First, securely place the pin into the weight stack. Carefully step up and place one knee (or foot, on standing platforms) onto the center of the pad. Once you're stable, firmly grasp the handles. You have several grip options:
- Overhand (Pronated) Grip: Palms face away from you. This is the standard pull-up grip and heavily targets the lats.
- Underhand (Supinated) Grip: Palms face towards you. This is a chin-up grip that engages your biceps more.
- Neutral Grip: Palms face each other. Many find this grip easiest on the shoulders.
Before you begin the pull, let your body hang with full arm extension. Engage your core and pull your shoulder blades down and back to create a stable starting position.
Step 3: Performing the Movement (Execution)
To begin the exercise, drive your elbows down towards the floor, focusing on pulling with your back muscles, not just your arms. Imagine you are trying to pull the handles down to your chest. Continue this motion until your chin is level with or slightly above the handles. Pause briefly at the top, then lower yourself back down with control. The descent should be slow and deliberate, taking about 2-3 seconds. Avoid simply dropping back down; controlling the negative portion of the lift is key to building strength.
Common Mistakes to Avoid for Maximum Results
The assisted pull up machine is a fantastic tool for building strength, but it's easy to develop bad habits that stall your progress and increase the risk of injury. By understanding and correcting common errors in form, tempo, and muscle activation, you can ensure every repetition moves you closer to your goal of performing unassisted pull-ups.
Using Too Little or Too Much Assistance
Finding the right amount of assistance is a balancing act. Using too much weight will make the exercise too easy, preventing your muscles from being adequately challenged for growth. Conversely, using too little assistance often leads to poor form, half-reps, and an over-reliance on momentum. As a rule of thumb, you should be able to complete 6-10 full repetitions with good form. The last one or two reps of a set should feel genuinely challenging but still be achievable.
Poor Form and Range of Motion
Quality over quantity is the key to progress. Cheating on your form only cheats you out of results. For a detailed breakdown of ideal technique, the Beginner's Guide to the Assisted Pull-Up Machine from Asphalt Green offers a fantastic visual reference. The most frequent form errors include:
- Partial Reps: Failing to extend your arms fully at the bottom (a dead hang) or not pulling your chin completely over the bar at the top.
- Shoulder Shrugging: Letting your shoulders bunch up towards your ears. Instead, focus on keeping them down and back.
- Swinging: Using momentum by kicking your legs or swinging your torso to get your chin over the bar.
- Dropping Down: Letting gravity do all the work on the way down. The lowering phase (the negative) is crucial for building strength, so control your descent.
Relying Only on Arm Strength
While your biceps and forearms are involved, the pull-up is primarily a back exercise that targets your latissimus dorsi ("lats"). If you only feel the burn in your arms, you aren't engaging the right muscles. To fix this, think of your hands as simple hooks. Instead of pulling with your hands, focus on driving your elbows down and back, squeezing your shoulder blades together as you ascend. This mind-muscle connection is critical for mastering the movement on the assisted pull up machine and beyond.
Your Progression Plan: From Assisted to Your First REAL Pull-Up
You've mastered the form and built a solid foundation. Now, it's time to turn your progress on the assisted pull up machine into the ultimate goal: your first unassisted pull-up. This isn't about random workouts; it's about a structured plan built on the principle of progressive overload. By gradually decreasing the assistance, you force your muscles to adapt and grow stronger over time. This is where your hard work pays off.
How to Structure Your Workouts
Consistency is your greatest ally. Aim to use the machine 2-3 times per week, ensuring at least one full day of rest between back-focused workouts to allow for muscle recovery and growth. For each session, perform 3-4 sets in the 8-12 repetition range. The simple rule for progression is this: once you can comfortably complete 3 sets of 12 reps at a specific weight, you've earned the right to make it harder. It's time to reduce the assistance.
A Sample 4-Week Progression Schedule
This is a template to show progressive overload in action. Listen to your body and adjust as needed. Let's assume your starting point requires 80 lbs of assistance to complete 8 reps.
- Week 1: Establish your baseline. Perform 3 sets of 8 reps (3x8) with 80 lbs of assistance. Focus on perfect form.
- Week 2: Build endurance. Using the same 80 lbs of assistance, push to complete 3 sets of 10-12 reps (3x10-12).
- Week 3: Increase the challenge. Reduce the assistance by 10-15 lbs (to 65-70 lbs). The exercise will feel much harder, so aim for 3 sets of 6-8 reps.
- Week 4: Consolidate your new strength. At this lower assistance level, work your way back up to completing 3 sets of 10-12 reps.
Once you complete this cycle, you are ready to reduce the weight again and repeat the process.
Testing for Your First Unassisted Pull-Up
When you've worked your way down to needing only 10-20 lbs of assistance, you're incredibly close. Now is the time to start testing. At the very beginning of your workout, when you're completely fresh, attempt one unassisted pull-up. Don't be discouraged if you don't get it at first. To bridge the final gap, incorporate exercises like negative pull-ups (jumping to the top position and lowering down slowly) and dead hangs to build immense grip and back strength.
Patience and a smart plan will get you over the bar. To support every step of your progress, find all the gear you need for your fitness journey in our Fitness Equipment collection.
Your Pull-Up Victory is Within Reach
You now have the complete roadmap to conquering one of fitness's most rewarding exercises. Remember, the key is consistency and proper form. By understanding how to correctly use the assisted pull up machine, you've taken the most important step in building the foundational back and arm strength required for success. This machine isn't a crutch; it's a strategic tool designed to bridge the gap between where you are now and your first unassisted pull-up.
Ready to bring that progress home? Whether you're just starting out or looking to complete your setup, we have solutions for every fitness level. It's time to build your perfect home gym with our wide selection of workout gear. Shop our full range of Home Fitness Equipment today!
Stick to the plan, avoid the common pitfalls we've outlined, and celebrate every small victory. That incredible feeling of lifting your own bodyweight over the bar is closer than you think. You’ve got this!
Frequently Asked Questions About the Assisted Pull Up Machine
How much weight should I start with on an assisted pull-up machine?
A good starting point is to select an assistance weight that is 50-75% of your body weight. The goal is to perform 8-12 repetitions with proper form. If you can complete more than 12 reps easily, decrease the assistance by 5-10 lbs. If you struggle to reach 8 reps, increase the weight. Remember, more weight on this machine makes the exercise easier.
Is the assisted pull-up machine effective for building muscle?
Yes, it is highly effective for building muscle, particularly for beginners. The assisted pull up machine allows you to train the pull-up movement pattern with enough volume to stimulate muscle growth in your back and arms. It's built for progressive overload; as you get stronger, you can gradually reduce the assistance weight, which is the fundamental principle for building strength and size.
What muscles does the assisted pull-up work?
The assisted pull-up is a compound exercise that primarily targets the latissimus dorsi (lats), the large muscles spanning your back. It also heavily recruits the biceps, rhomboids, and middle and lower trapezius. Additionally, your forearms, shoulders (rear deltoids), and core muscles are engaged to provide grip strength and stability throughout the entire movement, making it a comprehensive upper-body builder.
What's the difference between an assisted pull-up and an assisted chin-up?
The key difference is your grip. An assisted pull-up uses a pronated (overhand) grip, with hands wider than shoulder-width, which emphasizes the lat muscles. An assisted chin-up uses a supinated (underhand) grip, with hands about shoulder-width apart. This underhand grip significantly increases the involvement of your biceps, making it a powerful arm and back exercise.
How often should I train on the assisted pull-up machine?
For optimal results, incorporate assisted pull-ups into your routine 1 to 2 times per week. This frequency allows for adequate muscle recovery and growth. Always ensure you have at least 48 hours of rest between sessions that heavily target your back and biceps. Listen to your body and integrate this exercise as a key part of your "back day" or "pull day" workout.
My gym's machine has a knee pad, but I've seen ones with a foot bar. Is there a difference?
Functionally, there is no difference. Both the knee pad and the foot bar are designed to provide the same upward assistance to help you complete the pull-up. The choice between them is purely a matter of comfort and personal preference. Some people find kneeling on the pad more stable, while others prefer the standing posture offered by a foot bar. Use whichever type feels most secure to you.
What are good alternatives if my gym doesn't have this machine?
Excellent alternatives are available. You can use heavy resistance bands looped over a standard pull-up bar; place your knees or feet in the band for assistance. Another great option is performing "negative" pull-ups, where you jump to the top position and lower yourself down as slowly as possible. Finally, the lat pulldown machine is a fantastic tool for strengthening the exact same muscles.