

Leg Press Foot Placement: Your Ultimate Guide to Targeting Every Leg Muscle

You load up the leg press, determined to build powerful legs, but when the set is over, you're left with aching knees and a frustrating question: "Did I even hit my glutes?" If you've ever felt confused by the endless advice online or unsure if your form is more risky than rewarding, you're not alone. The secret to transforming this machine from a source of confusion into your greatest leg-building asset lies in one simple, yet crucial, detail: your leg press foot placement.
This guide is your new roadmap. We're moving beyond just putting your feet "somewhere" on the platform and diving into the science of strategic positioning. You'll learn exactly how to shift your stance to isolate your quads, ignite your glutes, hammer your hamstrings, and even target your inner thighs-all while keeping your back and knees safe. Get ready to perform every rep with confidence and finally see the specific, targeted results you've been working for.
The Foundation: Mastering Standard Leg Press Form First
Before you start experimenting with different foot positions to target specific muscles, it's absolutely crucial to master the fundamentals. Think of it as building the foundation of a house-without it, everything else is unstable. The neutral, all-purpose stance is your starting block. This standard leg press foot placement provides a perfectly balanced workout, engaging your quadriceps, hamstrings, and glutes for comprehensive lower body development. It’s the safest and most effective way for beginners to build foundational strength and learn the mechanics of the movement. Nailing the standard leg press form ensures you build a solid base, reducing injury risk and maximizing long-term gains.
For a clear visual on setting up your standard stance, watch this helpful video:
Your initial setup in the machine is just as important as your foot placement. Sit down and make sure your entire back, especially your lumbar region, is pressed firmly into the back pad. Your glutes should be flat on the seat, not lifted. This stable base prevents your lower back from rounding during the exercise, a common cause of injury. Once you're securely in position, you can focus on placing your feet.
Step-by-Step Guide to the Standard Foot Placement
Getting your setup right is half the battle. With your back and hips pressed firmly into the pad, follow these steps to position your feet correctly:
- Placement: Position your feet in the center of the platform, approximately shoulder-width apart.
- Toe Angle: Point your toes straight ahead or with a slight outward angle (around 15 degrees). Find what feels most natural and comfortable for your hips.
- Heel Contact: Your heels must remain flat on the platform throughout the entire repetition. If they begin to lift, you're putting undue stress on your knees.
- Knee Alignment: As you bend and extend your legs, ensure your knees track in a straight line over your feet. Do not let them cave inward.
Executing the Perfect Rep: Form & Safety Cues
With your feet in place, focus on executing each repetition with perfect form to maximize results and minimize risk.
- Control the Negative: Lower the weight slowly and with control, taking about 2-3 seconds for the descent (eccentric phase). Avoid letting the weight crash down.
- Drive Through Your Heels: Push the platform away by driving force through your mid-foot and heels, not the balls of your feet.
- Protect Your Knees: At the top of the movement, press until your legs are nearly straight but do not lock your knees out. Maintain a slight bend to keep tension on the muscles and protect your joints.
- Stay Seated: Your hips and lower back must maintain contact with the seat and back pad at all times. If your hips curl up at the bottom, you are going too deep and putting your lower back at risk.
How to Target Your Quadriceps with Foot Placement
If your goal is to build powerful, well-defined quadriceps, the leg press is an invaluable tool. The key to unlocking its quad-building potential lies in a simple biomechanical principle: maximizing knee flexion. The more your knee has to bend and extend under load, the more work your quads are forced to do. Mastering your leg press foot placement allows you to manipulate this range of motion, effectively turning the machine into a quad-sculpting powerhouse. Understanding how foot placement targets different muscles is the first step, as it allows you to isolate specific areas like the coveted 'teardrop' muscle (Vastus Medialis) just above the knee.
Low Foot Placement for Maximum Quad Activation
To put the focus squarely on your quads, you need to position your feet lower on the platform. This placement forces a greater degree of knee flexion as you lower the weight, increasing the mechanical tension on the quadriceps muscles. This is the go-to setup for overall quad mass and is particularly effective for developing the Vastus Medialis.
- Position: Place your feet on the lower half of the platform, maintaining a comfortable shoulder-width stance.
- Execution: Control the descent, allowing your knees to bend deeply but without letting your lower back or hips lift off the seat pad.
- Caution: This variation places more stress on the knee joint. If you have a history of knee issues or feel any sharp pain, move your feet higher. Always start with a lighter weight to ensure your form is perfect before progressing.
Narrow Stance Leg Press for Outer Quad Sweep
To build the 'outer sweep' of your quads, which is primarily the Vastus Lateralis muscle, a subtle change in your leg press foot placement is required. By bringing your feet closer together, you shift the emphasis to the outside of your thighs. This helps create a more aesthetic, flared look to your quads, contributing to the classic X-frame physique.
- Position: Bring your feet closer than shoulder-width apart, keeping them in the center or slightly lower on the platform. Your feet should be a few inches apart, not touching.
- Execution: As you press, concentrate on driving the platform straight up. It is crucial to prevent your knees from caving inward or touching each other.
- Focus: Maintain a slow, controlled tempo throughout the movement to keep the tension on the target muscle and protect your knee ligaments.
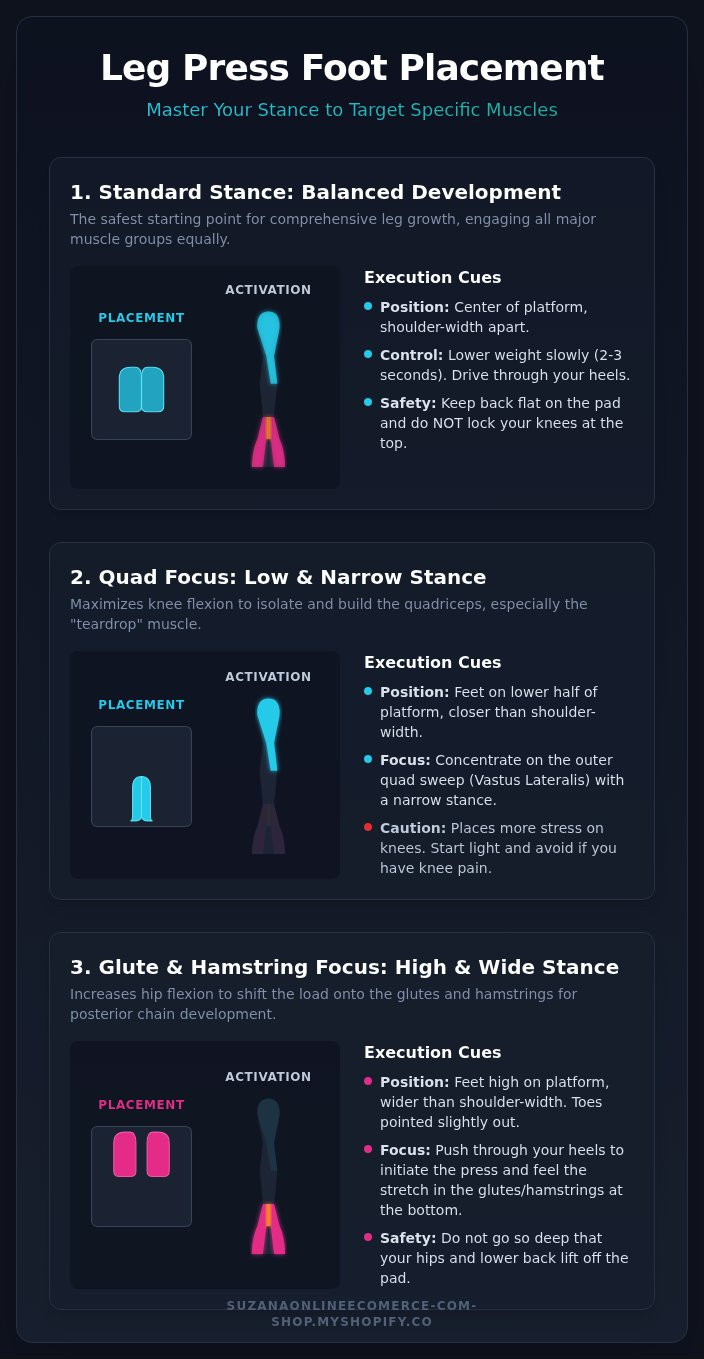
Shifting the Focus: Foot Placements for Glutes & Hamstrings
While the leg press is often seen as a quad-dominant exercise, a simple adjustment in your leg press foot placement can transform it into a powerful tool for building your glutes and hamstrings. The secret lies in manipulating your body's biomechanics to favor hip flexion and extension over knee flexion.
To target your posterior chain, you need to maximize the range of motion at your hips. Placing your feet higher on the platform achieves exactly this. This position forces your hips to bend more deeply as you lower the weight, mimicking the hinge pattern of exercises like Romanian Deadlifts. As a result, knee bend is reduced, taking the primary load off your quadriceps and placing it squarely on your glutes and hamstrings. Understanding these mechanics is key, and this detailed guide to foot placement provides an excellent breakdown of how foot position alters the angles at your joints to target specific muscles.
High Foot Placement for Glute & Hamstring Growth
This is the foundational setup for targeting your posterior chain. By positioning your feet high on the sled, you create a greater degree of hip flexion at the bottom of the movement, which is essential for glute and hamstring activation.
- Position: Place your feet near the top edge of the platform, at least shoulder-width apart. Your toes should be well above the center line.
- Execution: As you lower the weight, focus on feeling a deep stretch in your hamstrings. To initiate the press, drive powerfully through your heels. This cue is crucial for engaging your glutes effectively.
- Feel: You should feel the tension primarily in your glutes and the back of your legs, with less stress on your knees and quads.
Wide Stance 'Sumo' Leg Press for Glutes & Adductors
To further emphasize the glutes and bring your inner thighs (adductors) into the mix, adopt a wide or "sumo" stance. This variation allows for an even deeper hip engagement and is a fantastic movement for building well-rounded leg development.
- Position: Place your feet high and significantly wider than shoulder-width apart. Point your toes outwards at a 30 to 45-degree angle.
- Execution: Control the descent and ensure your knees track outwards, staying aligned with your feet. Do not let them cave inward. Drive through your heels and the outer edges of your feet to push the weight back up.
- Feel: This variation creates a strong contraction in the gluteus maximus and medius, along with a significant stretch and engagement of the adductor muscles.
Common Leg Press Mistakes and How to Correct Them
You've dialed in your stance and are ready to build serious leg strength. But even the most optimal leg press foot placement can be undermined by poor form. Incorrect technique not only stalls your progress but also shifts dangerous stress from your muscles to vulnerable joints. Think of this section as your final safety checklist before you press.
By mastering the movement pattern and avoiding these common errors, you ensure every repetition is safe, effective, and targeted for maximum growth.
Mistake #1: Lifting Your Hips Off the Pad
This is one of the most critical errors. As you bring the weight down, your lower back and glutes should remain firmly planted against the seat pad. If your hips curl up, it's a clear sign that you are either using too much weight or descending too far. This rounding of the lower back places immense and dangerous pressure on your lumbar spine.
- Don't do this: Allow your hips to lift off the seat at the bottom of the movement, creating a curve in your lower back.
- Do this instead: Lower the weight and reduce your range of motion. Stop the descent the moment you feel your hips begin to tuck under. Your back should always be in a stable, neutral position.
Mistake #2: Locking Out Your Knees
Forcefully straightening and "locking" your knees at the top of the press is a recipe for disaster. This action momentarily transfers the entire load from your quadriceps to your knee joint, including the ligaments and connective tissues. It provides a moment of rest for your muscles but puts your joints at high risk of hyperextension and serious injury.
- Don't do this: Snap your knees straight at the peak of the repetition.
- Do this instead: Press the weight until your legs are nearly straight but always maintain a slight, soft bend in your knees. This keeps the tension on the target muscles and protects your joints.
Mistake #3: Performing 'Half Reps'
Loading the machine with more weight than you can handle through a full range of motion is often called "ego lifting." Performing shallow, partial repetitions significantly reduces muscle activation, hindering hypertrophy and strength gains. You're moving heavy weight, but you're not getting the full benefit of the exercise.
- Don't do this: Use excessive weight that only allows you to move the sled a few inches.
- Do this instead: Select a weight you can control through a full, safe range of motion. Combining proper depth with your chosen leg press foot placement is the true key to unlocking results.
Mastering these details ensures every rep counts. For gear that supports your commitment to proper form, check out our collection of premium fitness apparel.
Unlock Your Lower Body Potential with Perfect Placement
You now hold the blueprint to a more effective leg day. As we've covered, the leg press is a powerhouse for targeted growth, but only when you leverage your stance. Shifting your feet lower isolates the quads, while a higher stance fires up the glutes and hamstrings. Above all, remember that solid form is your non-negotiable foundation for both safety and results. Mastering the principles of leg press foot placement is what separates a good workout from a great one.
Ready to put this knowledge into action? Build a powerful home gym with our curated equipment and start crushing your goals. With a safe and secure checkout for all your fitness needs, you're just a click away from the ultimate leg day setup. Explore our collection of home fitness equipment to build your perfect leg day.
Keep pushing, stay consistent, and build the powerful legs you've been working for.
Frequently Asked Questions About Leg Press Foot Placement
Is the leg press bad for your knees?
The leg press is not inherently bad for your knees and can often be a safer alternative to squats for those with pre-existing issues. The key is proper form. Avoid locking your knees at the top of the movement and ensure they track in line with your feet. The risk of injury increases with improper technique, such as using excessive weight or allowing your knees to cave inward. When performed correctly, it’s a highly effective and joint-friendly exercise.
Which foot placement is best for overall leg growth?
For balanced, overall leg development, the best position is feet shoulder-width apart in the center of the platform. This standard stance ensures that you effectively engage the quadriceps, hamstrings, and glutes without placing excessive emphasis on one muscle group over another. This neutral leg press foot placement is the ideal starting point for building a strong, symmetrical foundation for your lower body and is perfect for targeting all major leg muscles simultaneously.
How deep should I go on the leg press?
You should lower the weight until your knees are at a 90-degree angle, or slightly more if your flexibility allows. The most important rule is to keep your lower back and hips firmly planted against the seat pad. If you feel your tailbone lifting or your lower back rounding, you have gone too deep. This "butt wink" can place unnecessary strain on your lumbar spine. Prioritize a controlled range of motion over excessive depth to ensure safety and effectiveness.
Can you do a single-leg leg press, and what is the benefit?
Yes, the single-leg leg press is an excellent unilateral exercise. Its main benefit is isolating one leg at a time, which helps to identify and correct strength imbalances between your left and right sides. This variation also increases core activation to maintain stability during the movement. By focusing on one leg, you can improve your mind-muscle connection and stimulate growth with less overall weight, reducing the compressive load on your spine compared to the two-legged version.
Leg press vs. squats: which is better for building mass?
Both exercises are phenomenal for building leg mass, but they have different advantages. Squats are a compound exercise that recruits more stabilizer muscles and stimulates a greater systemic growth response. However, the leg press allows you to isolate the leg muscles more directly and often with heavier weight, which can be superior for pure hypertrophy. For a well-rounded and massive lower body, incorporating both exercises into your training routine is the most effective approach.
How do I know if the weight is too heavy on the leg press?
The weight is too heavy if your form breaks down. Telltale signs include being unable to complete a full range of motion, your hips lifting off the seat at the bottom of the rep, or your knees caving inward. If you have to use momentum to push the weight or you can't control the descent, the load is excessive. Always choose a weight that allows you to perform every repetition with perfect technique for your target rep range.