

Squat Rack: The Ultimate Buyer's Guide for Your Home Gym

The decision to build a serious home gym often starts with one key piece of equipment: the squat rack. But that initial excitement can quickly turn to analysis paralysis. Will it fit in my garage? Is a half rack safe enough for heavy lifts? What's the real difference between 11-gauge and 12-gauge steel, and does it even matter for me? If you're feeling overwhelmed by the options and technical jargon, you are not alone, and you've come to the right place.
Consider this guide your personal spotter. We're here to cut through the noise and demystify the entire process of choosing the perfect rack for your home. We’ll break down the crucial differences between power racks, half racks, and squat stands, helping you match the right equipment to your specific fitness goals. We'll also tackle the big questions about safety, stability, and how to measure your space to ensure you get a perfect fit, even in a tight basement.
By the end of this article, you'll have the confidence to select a safe, sturdy rack that fits your budget and empowers you to reach new personal records. Let's build the foundation of your dream home gym, together.
What is a Squat Rack and Why is it the Heart of a Home Gym?
Think of a home gym, and the first image that often comes to mind is a sturdy steel frame designed for one primary purpose: enabling safe, heavy lifting. That frame is the squat rack. At its core, a squat rack is a piece of equipment designed to securely hold a barbell at various heights, allowing you to perform foundational strength exercises. Often referred to as a Power rack when it's a full four-post cage, this single station is the key to unlocking progressive overload-the fundamental principle of consistently adding weight to the bar to build muscle and strength. Without it, safely pushing your limits on major lifts becomes nearly impossible.
To see how a rack functions as the cornerstone of a serious training space, check out this excellent overview:
The difference between lifting with and without a rack is the difference between confidence and catastrophe. Trying to squat heavy without one means if you fail a rep, the bar comes down on you. With a rack, you can push for that extra rep knowing that if you don’t make it, the safety features will catch the barbell, preventing serious injury.
The Core Benefits of Training with a Rack
Investing in a rack provides three transformative advantages for your home workouts:
- Safety First: The most critical benefit. Adjustable J-cups hold the barbell before and after your set, while safety spotter arms or pins act as your personal, tireless spotter, catching the weight on a failed lift.
- Unmatched Versatility: While "squat" is in the name, its utility extends far beyond. It's your station for bench presses, overhead presses, barbell rows, and dozens of other movements.
- Space and Time Efficiency: By consolidating numerous exercises into one footprint, a rack saves valuable floor space and streamlines your workout. You can move from squats to presses to pull-ups without changing stations.
Key Exercises Unlocked by a Squat Rack
A rack is the gateway to the most effective strength-building exercises you can do. It opens the door to a full spectrum of training possibilities right in your home.
- Compound Lifts: These are the pillars of any strength program. The rack is essential for safely performing the "big three"-Barbell Back Squats, Bench Press, and the Standing Overhead Press.
- Accessory Work: Fine-tune your strength with movements like Rack Pulls to build your back and grip, or use the barbell for Inverted Rows to target your lats.
- Bodyweight Training: Many modern racks integrate features like a multi-grip pull-up bar and attachments for dips, turning your power station into a complete bodyweight gym as well.
The Main Types of Squat Racks: A Head-to-Head Comparison
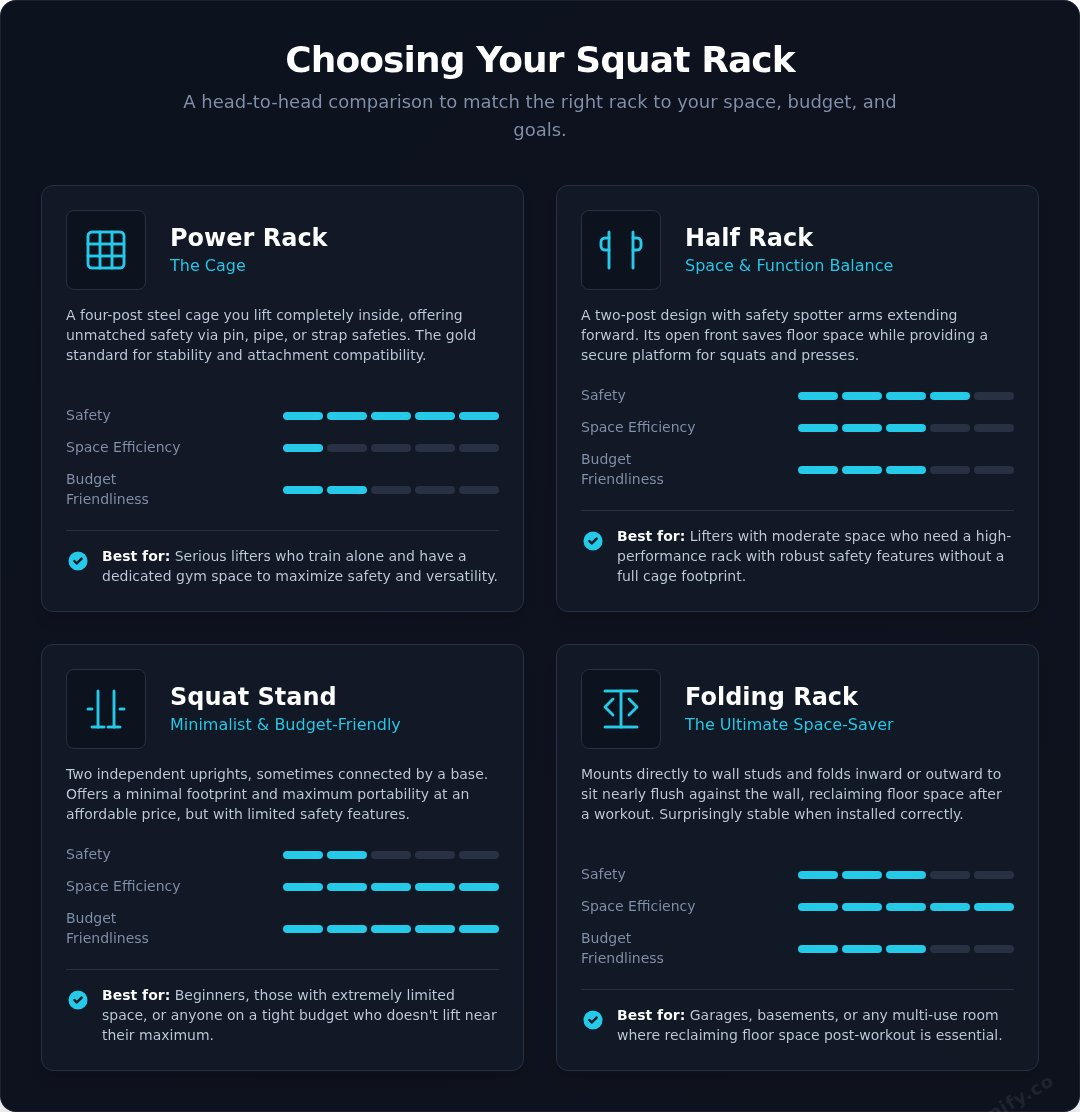
Before you choose a squat rack, it's crucial to understand the main categories. The right option for you hinges on three key factors: your available space, your budget, and your long-term lifting goals. From a full commercial-style cage to a minimalist stand, each design offers a unique blend of safety, versatility, and footprint. Let's break down the four main types to help you find the perfect fit for your home gym.
Power Racks (The Cage): Maximum Safety and Versatility
A power rack is a four-post steel cage you lift completely inside of. Its primary advantage is unmatched safety, thanks to adjustable pin-pipe or strap safeties that will catch a barbell on a failed lift. This is crucial for safely pushing your limits on compound lifts, which are proven to build foundational strength and reduce injury risk when performed with proper form. While they offer incredible stability and attachment options, they have the largest footprint and are often the most expensive.
- Best for: Serious lifters and anyone who regularly trains alone and has dedicated space.
Half Racks: A Balance of Space and Function
A half rack features a two-post design with safety spotter arms extending forward. This open-front construction saves significant floor space compared to a full power rack while still providing a secure platform for squats and presses. They offer good versatility for a variety of exercises but can feel less enclosed and may be slightly less stable for dynamic movements like kipping pull-ups.
- Best for: Lifters with moderate space who still want high performance and robust safety features.
Squat Stands: The Minimalist & Budget-Friendly Option
The simplest design, squat stands consist of two independent uprights, sometimes connected by a base bar for stability. Their key benefits are a minimal footprint, excellent portability, and a highly affordable price point. However, they typically offer limited safety features (many lack spotter arms) and have lower weight capacities, making them less suitable for very heavy lifting.
- Best for: Beginners, those with extremely limited space, or budget-conscious buyers.
Folding & Wall-Mounted Racks: The Ultimate Space-Savers
Engineered for multi-use spaces, these racks mount directly to your wall studs and can be folded inward or outward to sit nearly flush against the wall. When properly installed, they are surprisingly stable and robust. The main trade-offs are the permanent installation requirement and potentially fewer compatible attachments compared to freestanding racks.
- Best for: Garages, basements, or any room that needs to reclaim floor space after a workout.
Key Features to Consider Before You Buy
Choosing the right squat rack for a small space goes beyond just finding one that fits. The small details-from the thickness of the steel to the spacing of the holes-dictate the rack's safety, longevity, and how it will grow with you. These features determine not only how the rack performs today but also its potential for future expansion with new attachments. For an even deeper dive, this comprehensive buyer's guide from the experts at Garage Gym Reviews is an invaluable resource. Remember the carpenter's rule: measure twice, buy once.
Steel Construction: Understanding Gauge and Upright Size
The foundation of any durable squat rack is its steel. Pay attention to two key specs:
- Gauge: This measures steel thickness. Counterintuitively, a lower number means thicker, stronger steel. While 14-gauge is acceptable for light use, 11-gauge steel is the industry gold standard for serious home gyms, offering excellent strength and stability.
- Upright Size: Common sizes are 2"x2", 2"x3", and 3"x3". Larger uprights, like 3"x3", provide maximum stability and are compatible with a wider range of attachments, allowing you to build a complete training "ecosystem."
Weight Capacity: How Much is Enough for You?
A rack's static weight capacity indicates how much weight it can safely hold without moving. This number is a direct reflection of its materials and build quality. Don't just plan for the weight you lift now; choose a capacity that gives you plenty of room to grow. A rack rated for 700-1000 lbs offers peace of mind and ensures it will remain stable and secure as you get stronger.
Dimensions: Footprint, Height, and Depth
The most common mistake when buying a rack for a small space is forgetting to account for ceiling height. Before you buy, measure your ceiling and ensure you have enough clearance, especially if the rack includes a pull-up bar (you'll need at least a foot of headroom). Also, consider the total working footprint-not just the rack itself, but the extra 3-4 feet of side clearance needed for a 7-foot Olympic barbell and space to load plates.
Hole Spacing (e.g., Westside): Why It Matters
This seemingly minor detail is critical for safety and proper lift mechanics. Closer hole spacing allows for more precise placement of J-cups and safety spotter arms. Look for racks with "Westside" spacing, which features 1-inch spacing through the bench press zone. This lets you set the safety bars just below your chest, ensuring you can safely bail out of a failed lift without getting pinned.
Essential Attachments and Accessories for Your Rack
A power rack is more than just a place to squat; it's the central hub of your home gym. The right attachments transform a basic frame into a multi-functional training station, allowing you to perform dozens of exercises and save money on bulky, single-purpose machines. Before you purchase a squat rack, it's crucial to check its attachment compatibility, as this will determine its long-term value and versatility.
We can separate these add-ons into two categories: the absolute must-haves and the highly recommended upgrades that expand your workout potential.
The Non-Negotiables: J-Cups and Safety Systems
These components are fundamental to the rack's function and your safety. Never purchase a rack that doesn't include a reliable version of both. J-Cups (or J-Hooks) are the hooks that hold your barbell. While standard versions work, premium sandwich-style cups with plastic lining offer superior protection for your barbell's knurling. More importantly, safety systems are your lifeline when training alone. The most common types include:
- Pin-Pipe Safeties: Simple, strong steel tubes that slide through the rack. Effective but can be loud.
- Strap Safeties: Heavy-duty nylon straps that are quieter and gentler on your barbell if you have to drop the weight.
- Spotter Arms: External arms that attach to the front of the uprights, essential for working outside a half-rack.
The Pull-Up Bar: A Critical Upper Body Tool
Nearly every power rack includes a pull-up bar, but not all are created equal. This simple feature adds immense value, providing a dedicated station for pull-ups, chin-ups, and hanging leg raises. Look for a multi-grip bar, which offers neutral and angled grips to target different back and bicep muscles. The bar's diameter (thickness) also affects comfort and grip challenge-a standard bar is typically around 1.25 inches.
Popular Upgrades to Expand Your Workouts
Once you have the essentials, these popular attachments can take your training to the next level. They consolidate your gym footprint and add incredible exercise variety to your squat rack setup.
- Dip Station: A simple, effective attachment for building powerful triceps and a strong chest.
- Landmine Attachment: A pivoting sleeve that holds a barbell, perfect for rotational strength, rows, and presses.
- Plate Storage Pegs: These keep your space tidy and serve a dual purpose by adding weight and stability to the base of your rack.
Ready to build out your ultimate home gym? Explore our range of workout accessories to complete your setup.
Your Home Gym's Cornerstone: The Final Verdict
Choosing the right squat rack is the single most important decision for your home gym. It’s the foundation upon which your strength and fitness goals will be built. As we've explored, understanding the core differences between power racks, half racks, and squat stands-and focusing on crucial features like safety spotters, steel gauge, and attachment compatibility-empowers you to make a smart investment. The perfect squat rack isn't just about lifting heavy; it's about creating a safe, versatile, and motivating space to achieve your best results.
Now that you're equipped with the knowledge, it's time to take action. We offer a wide selection of home gym essentials, allowing you to build your workout space piece by piece with gear for every fitness level. Don't wait to start your journey to a stronger you. Ready to build your dream home gym? Explore our fitness equipment collection. Your ultimate workout space is just a click away.
Frequently Asked Questions About Squat Racks
What's the difference between a squat rack and a power rack?
A squat rack, often called a squat stand or half rack, consists of two steel uprights. In contrast, a power rack (or power cage) has four uprights connected to form a cage you lift inside. The primary difference is safety; power racks offer superior protection with internal safety pins or straps, making them ideal for lifting heavy alone. Squat racks are more compact and affordable, perfect for the space constraints discussed in this article.
How much should I expect to spend on a good quality squat rack?
For a durable and safe home gym squat rack, a reasonable budget is between $300 and $800. Entry-level squat stands can be found for under $300, while more robust half-racks with features like multi-grip pull-up bars and storage options can cost over $1,000. The price typically reflects the steel thickness (gauge), weight capacity, and overall build quality. Investing in a quality rack ensures safety and longevity for your workouts.
Do I really need to bolt my squat rack to the floor?
It depends on the rack's design and your training style. Many squat stands and some half-racks are designed with a large, stable base and don't require bolting for general use. However, if you plan on lifting very heavy or performing dynamic movements like kipping pull-ups, bolting the rack down is highly recommended for maximum safety. Always consult the manufacturer's instructions, as some warranties are void if the rack isn't secured as specified.
What is the minimum ceiling height I need for a squat rack?
To determine the minimum ceiling height, add at least 6-12 inches to the total height of the rack. Most squat racks are between 85 and 95 inches tall. This extra space is crucial for performing overhead presses or pull-ups without hitting the ceiling. A ceiling height of 8 feet (96 inches) is a safe minimum for most compact models, but always measure your space and check the specific product dimensions before you buy.
Can I do bench presses safely in a squat stand?
Yes, but only if the squat stand is equipped with adjustable spotter arms. These safety attachments are essential for catching the barbell if you fail a lift while training alone. Without them, bench pressing in a squat stand can be extremely dangerous. Position the spotter arms just below your chest at the bottom of the movement. This provides a safety net while still allowing for a full range of motion during the press.
What does 'Westside hole spacing' mean and do I need it?
Westside hole spacing refers to 1-inch spacing between adjustment holes in the bench press area of a rack, with wider 2-inch spacing above and below. This allows for very precise height adjustments for your J-cups and safeties, which can help optimize leverage for heavy lifts. While it's a premium feature favored by competitive powerlifters, it is not essential for most home gym users. Standard 2-inch spacing is perfectly sufficient for general strength training.
Is an 11-gauge steel rack necessary for a home gym?
While 11-gauge steel is the commercial industry standard for its incredible durability, it's often overkill for a home gym. A rack made from 12-gauge or even 14-gauge steel is more than strong enough for the vast majority of lifters, often supporting 700 lbs or more. Racks with thinner steel are also more affordable and lighter, making them easier to move and assemble in a small space without sacrificing the safety needed for home use.